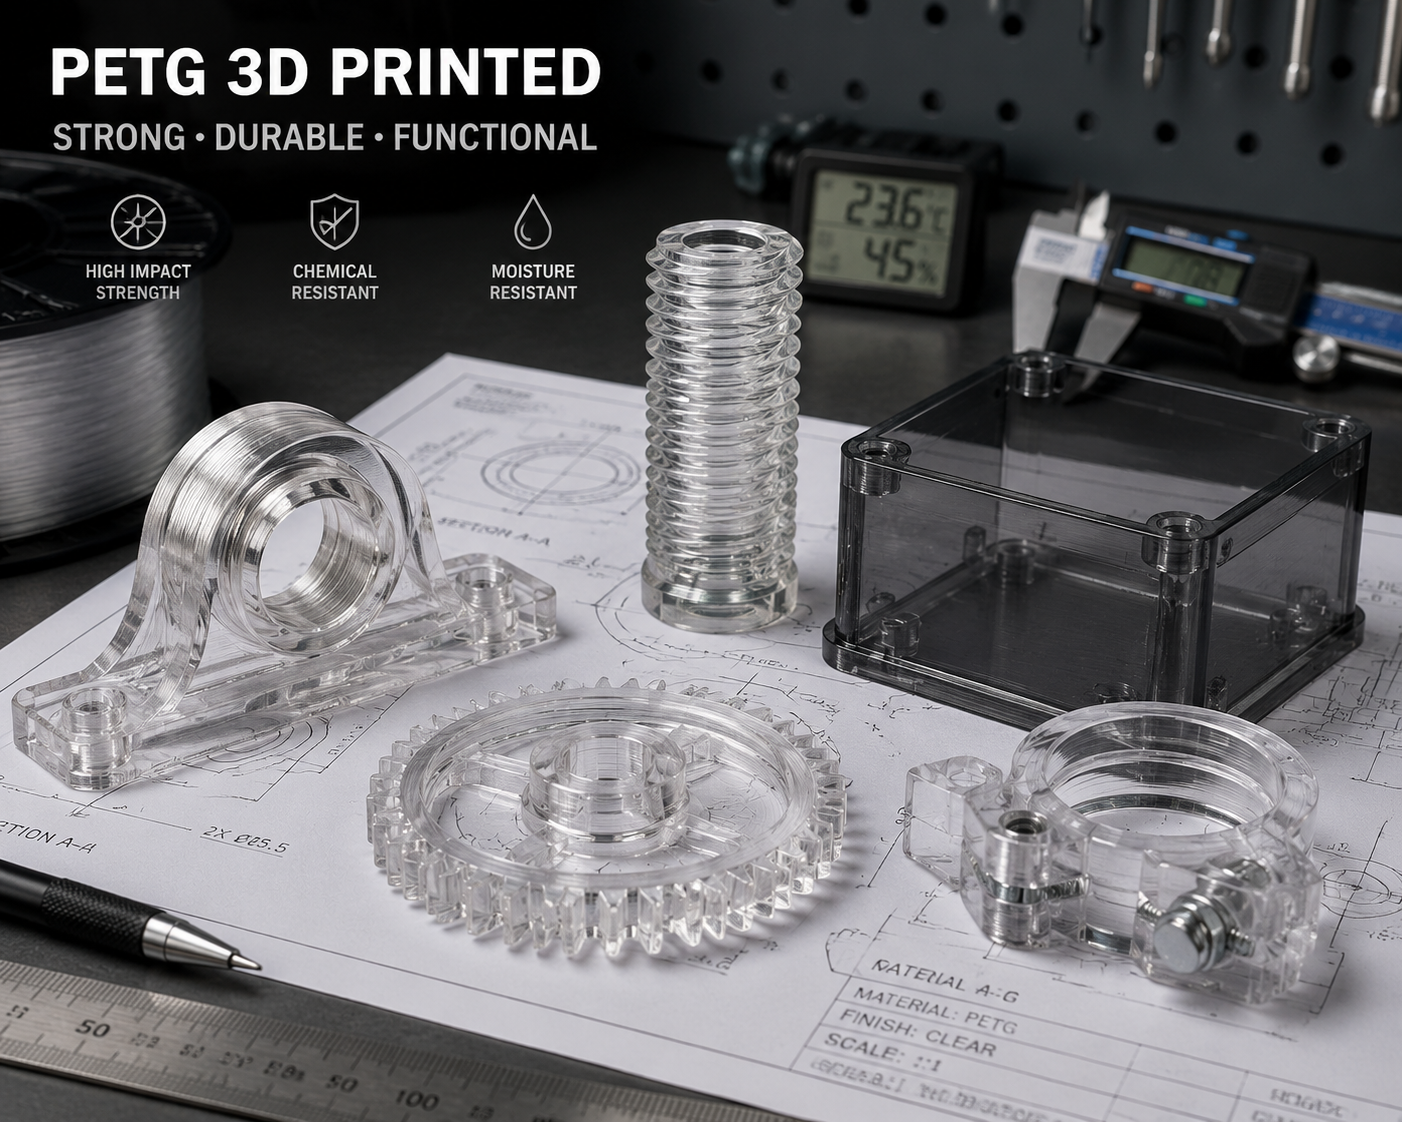
3D-printen met PETG werkt het beste als je een evenwicht vindt tussen temperatuur, koeling en vochtbeheersing, in plaats van het te behandelen als PLA. Polyethyleentereftalaat met glycolmodificatie — PETG — neemt precies het midden in, waardoor het de standaardaanbeveling is voor iedereen die vraagt: “Welk filament moet ik gebruiken?” De glycolmodificatie voorkomt de kristallisatie die standaard PET broos en ongeschikt voor 3D-printen maakt, wat resulteert in een materiaal dat bijna net zo gemakkelijk te printen is als PLA, bijna net zo sterk is als ABS, en bovendien een chemische bestendigheid en helderheid biedt die geen van beide kan evenaren. Als je eerst een breder overzicht van de afwegingen wilt, bekijk dan onze Vergelijking tussen PLA, PETG en ABS beschrijft het snelste raamwerk voor materiaalkeuze.
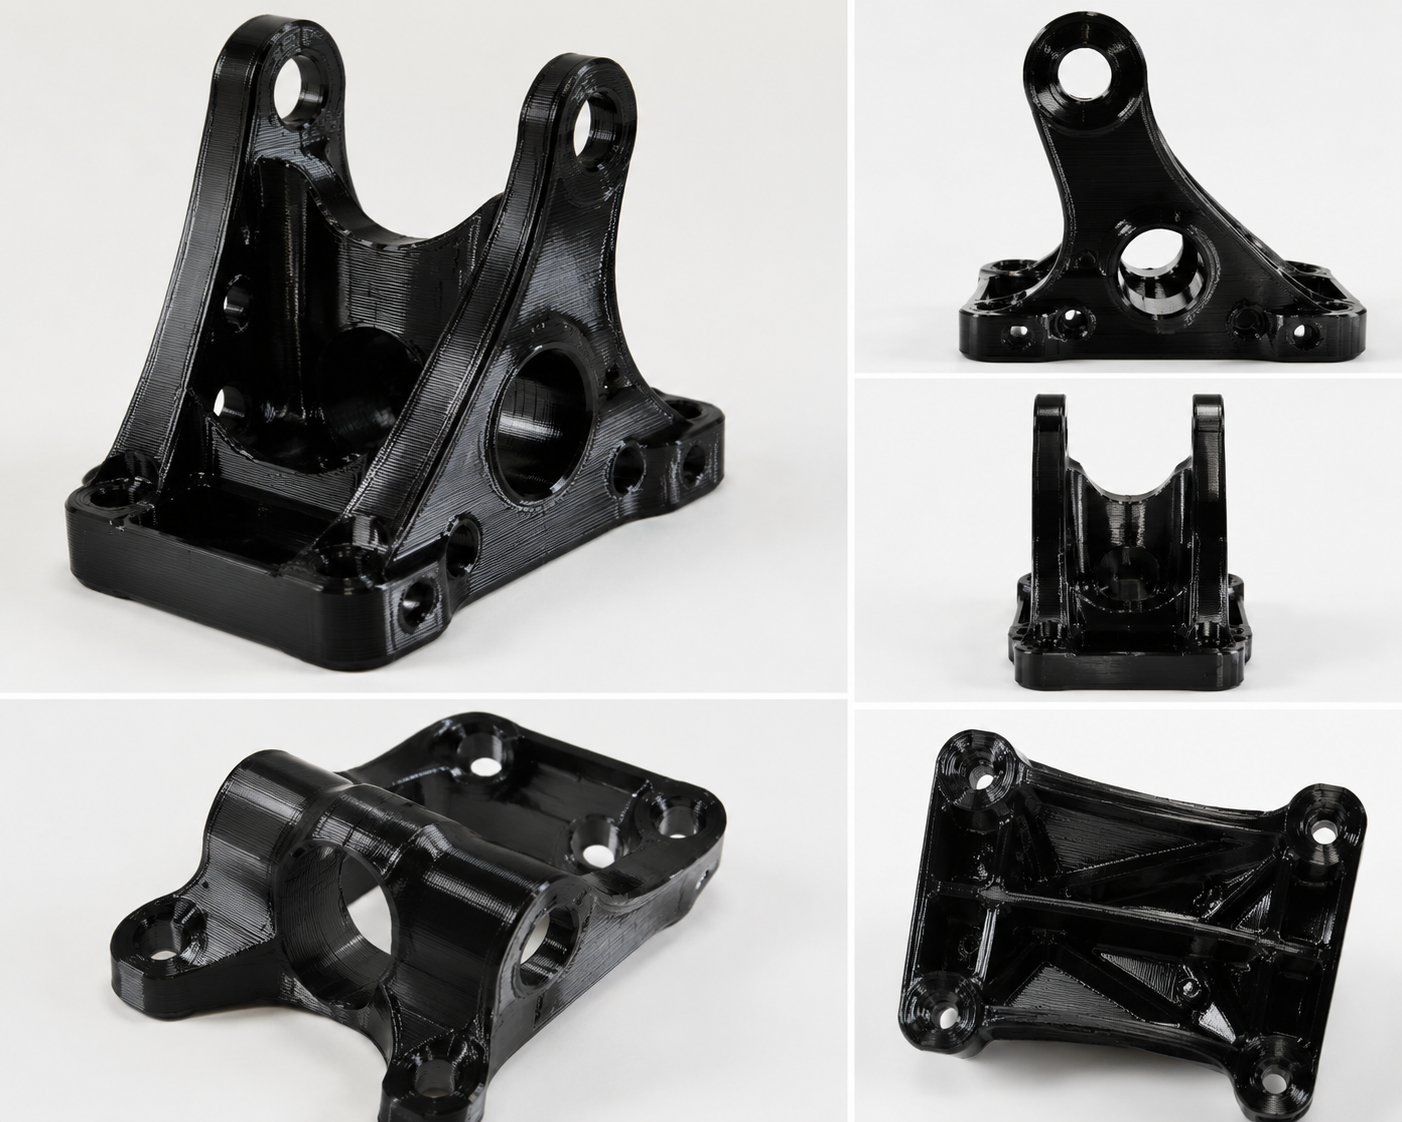
PETG is stilletjes uitgegroeid tot het werkpaard van het functionele FDM-printen. Het domineert de markt voor printeronderdelen (alle geprinte onderdelen van elke Voron-printer zijn van PETG), mechanische beugels, mallen en opspanningen, en elke toepassing waarbij de broosheid van PLA onaanvaardbaar is, maar het gedoe met het printen van ABS niet gerechtvaardigd is. Inzicht in de specifieke eigenschappen, eigenaardigheden en optimale instellingen van PETG maakt de weg vrij voor een materiaal dat geschikt is voor het merendeel van de functionele printtaken.
De chemie: wat glycolmodificatie nu eigenlijk doet
Standaard PET — het materiaal dat wordt gebruikt voor waterflessen en voedselverpakkingen — is een semi-kristallijn polymeer. Wanneer het vanuit de smelt wordt afgekoeld, ordenen de PET-ketens zich in geordende kristallijne gebieden. Daarom zijn PET-flesvoorvormen na het spuitgieten doorzichtig, maar worden ze ondoorzichtig wanneer ze worden uitgerekt (door rek geïnduceerde kristallisatie). Het probleem voor 3D-printen is dat kristallisatie het materiaal ook broos maakt — de kristallijne domeinen fungeren als spanningsconcentrators en verhinderen energieafvoer door ketenbeweging.
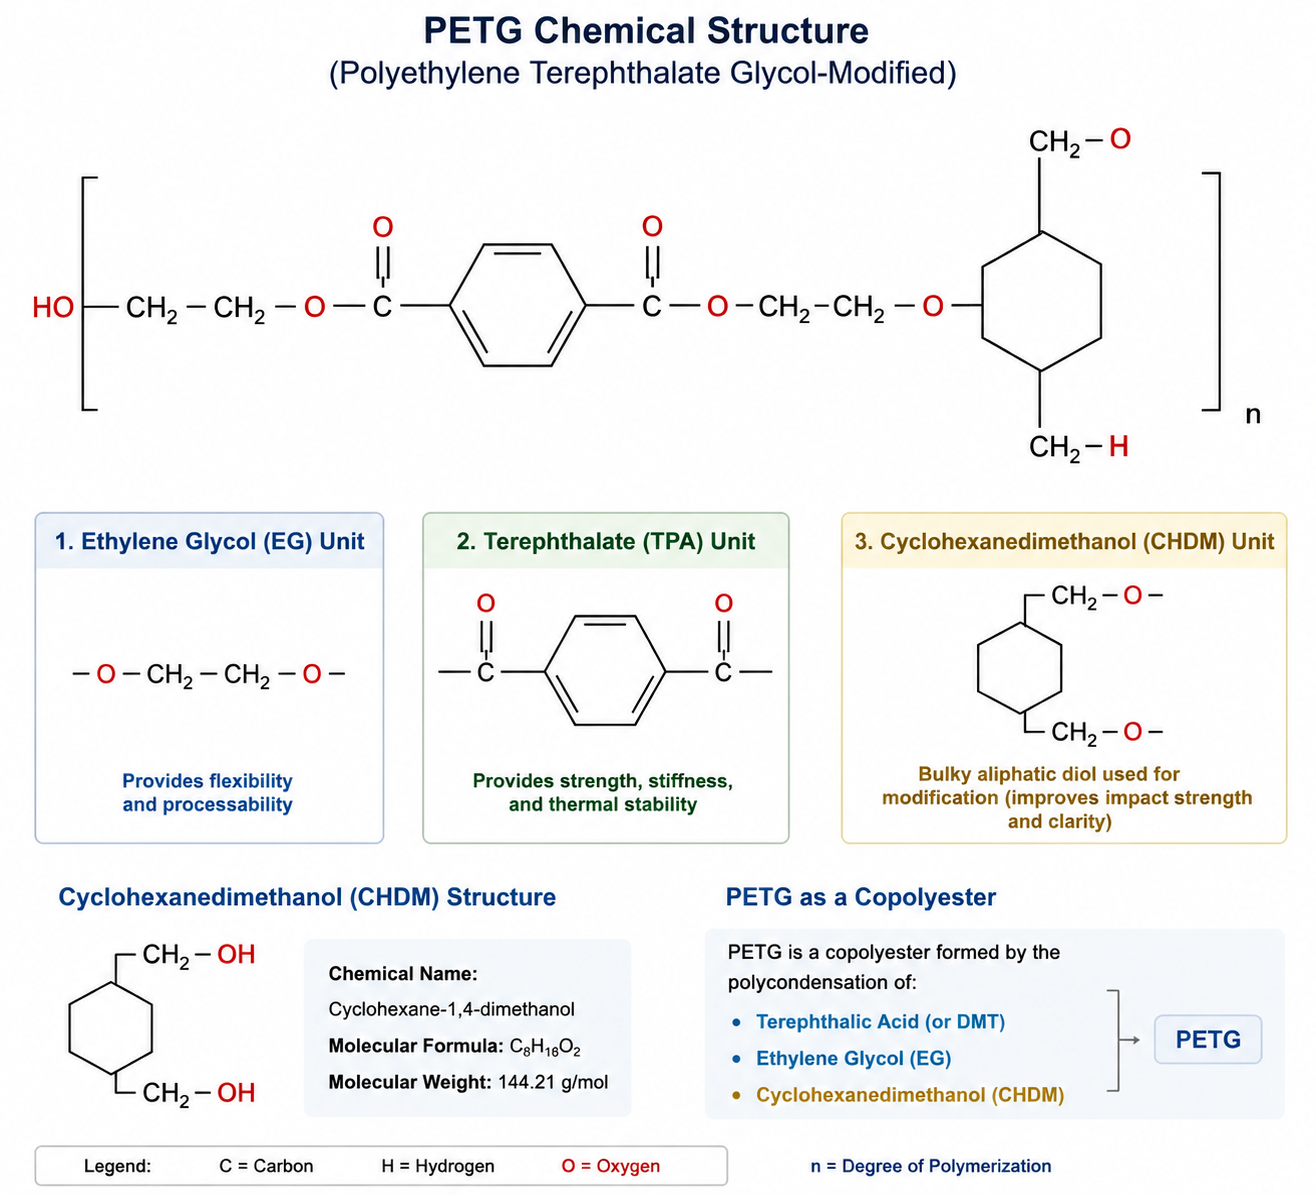
Bij de glycolmodificatie van PETG wordt een deel van de ethyleenglycolmonomeren vervangen door cyclohexaandimethanol (CHDM), een volumineuzer glycol dat de ketenpakking verstoort. De CHDM-eenheden voorkomen kristallisatie volledig — PETG is volledig amorf, wat betekent dat het na afkoeling taai en helder blijft. Het nadeel is dat de glasovergangstemperatuur daalt van ongeveer 80 °C voor PET naar eveneens ongeveer 80 °C voor PETG (de Tg is vergelijkbaar, maar het kristallisatiegedrag is verdwenen), en dat de trekmodulus licht afneemt als gevolg van de verminderde ketenpakkingsdichtheid.
Deze amorfe aard verklaart ook het printgedrag van PETG. Omdat er geen kristallisatie plaatsvindt, kan PETG relatief snel worden afgekoeld zonder broos te worden — daarom is er geen gesloten behuizing nodig en kunnen er koelventilatoren voor de onderdelen worden gebruikt, wat bij ABS niet mogelijk is. Door de glycolmodificatie is PETG bovendien chemisch bestendiger dan PLA, aangezien de aromatische tereftalaatgroepen in de ruggengraat weerstand bieden tegen veel oplosmiddelen, oliën en zwakke zuren die de esterbindingen van PLA zouden aantasten.
| Eigendom | PETG | PLA | ABS | PC |
|---|---|---|---|---|
| Treksterkte | 50-55 MPa | 50-60 | 35-45 | 60-70 |
| Slagvastheid (Izod) | 80-110 J/m | 30-50 | 200-400 | 600-850 |
| Flexural Modulus | 2,0–2,2 GPa | 3.0-3.5 | 2.0-2.5 | 2.3-2.5 |
| Glasovergangstemperatuur (Tg) | ~80 °C | ~60 °C | ~105 °C | ~145 °C |
| Rek bij breuk | 15-25% | 5-10% | 10-25% | 50-120% |
| Dichtheid | 1,27 g/cm³ | 1.24 | 1.04 | 1.20 |
| Bedrukbaarheid | Gemakkelijk-Matig | Heel eenvoudig | Moeilijk | Zeer moeilijk |
| Bijlage vereist | Nee | Nee | Ja | Ja |
Printervereisten: wat PETG nodig heeft
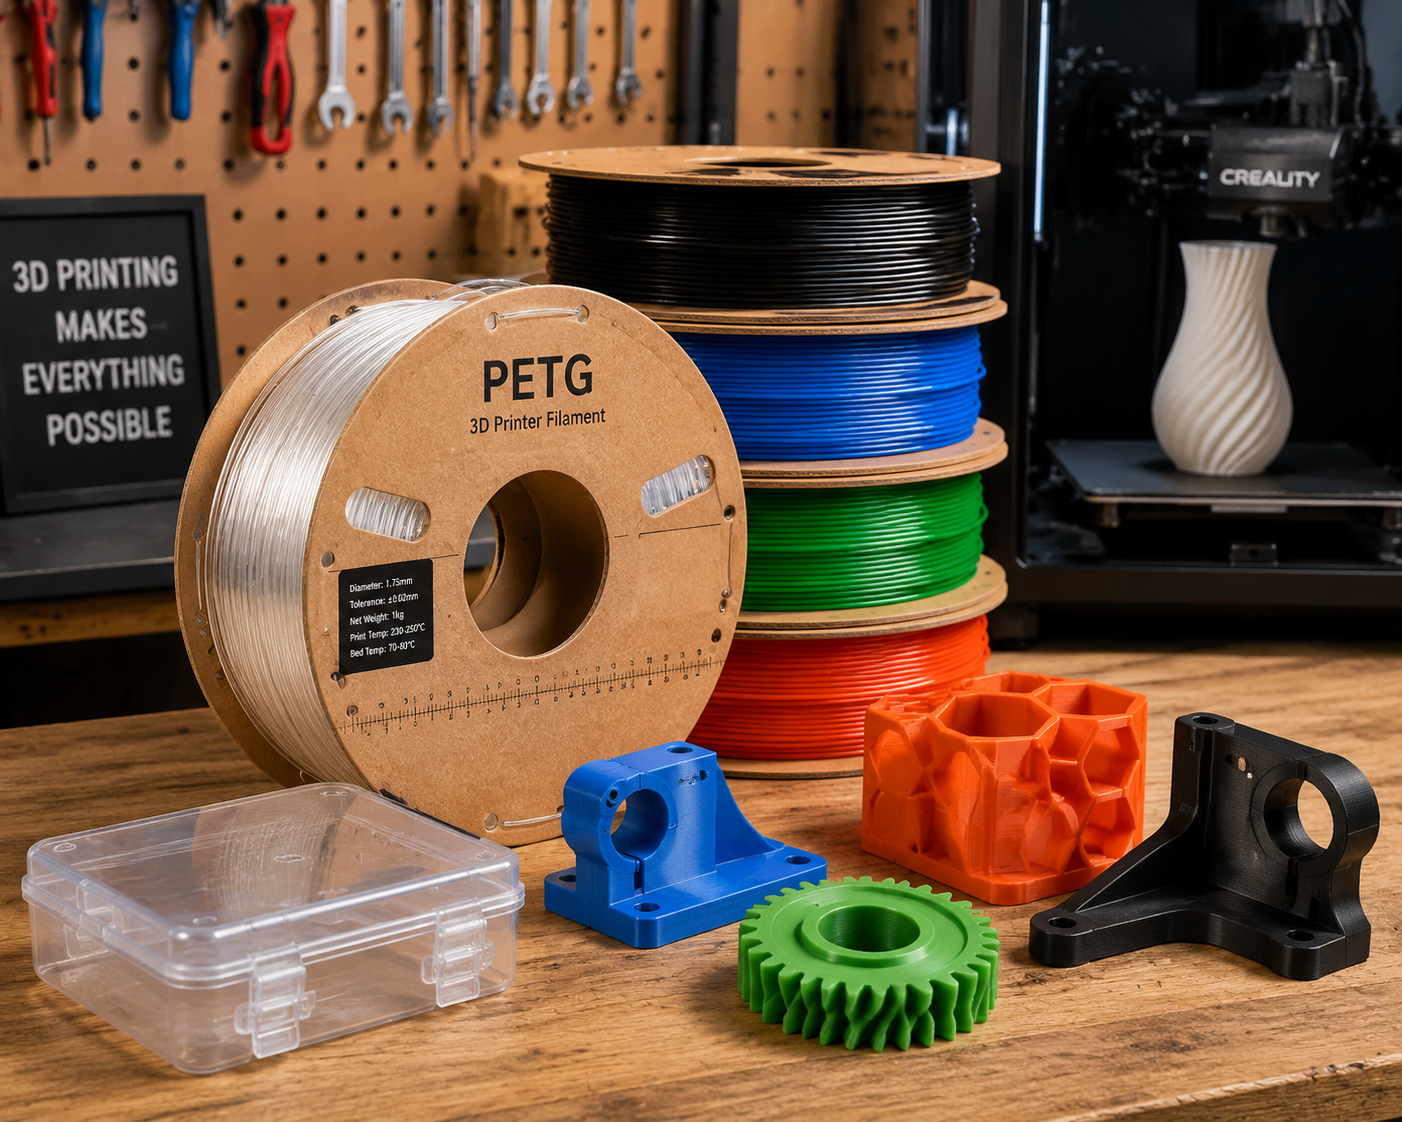
PETG stelt opmerkelijk weinig eisen aan de hardware. Een volledig metalen hotend wordt aanbevolen, maar is niet strikt noodzakelijk — PETG wordt geprint bij 230-250 °C, wat aan de bovengrens ligt van met PTFE beklede hotends, maar onder de afbraakdrempel van 250-260 °C. Een verwarmd bed van 70-85 °C is nuttig, maar PETG hecht ook goed aan een bed van 60 °C mits het oppervlak op de juiste manier is voorbereid. Een behuizing is niet nodig voor PETG; een te hoge omgevingstemperatuur kan de stringing-problemen bij PETG zelfs verergeren.
De enige hardware-eis waar PETG echt baat bij heeft, is een extruder met directe aandrijving. PETG is flexibeler dan PLA en heeft meer last van knikken in een Bowden-buis, vooral bij zachtere varianten of hogere printtemperaturen. Dit is geen strikte vereiste – ook met een Bowden-opstelling kan PETG worden geprint – maar een direct aangedreven extruder voorkomt het meest voorkomende probleem bij het extruderen van PETG, namelijk onregelmatige extrusie als gevolg van het samendrukken en terugveren van het filament in de Bowden-buis.
Voor de spuitmond wordt gehard staal aanbevolen in plaats van messing. PETG is op zichzelf niet schurend — het bevat geen vulstoffen — maar door de hogere printtemperatuur in combinatie met de neiging van PETG om aan de spuitmond te blijven kleven en afzettingen te vormen, slijten messing spuitmonden bij PETG sneller dan bij PLA. Een spuitmond van gehard staal levert bij dezelfde temperatuur identieke resultaten op en gaat aanzienlijk langer mee.
Bedhechting: de kleverige paradox
De hechting van PETG op het printbed vormt een bijzondere uitdaging: het hecht te goed. Op kaal glas, PEI of BuildTak bij de juiste temperatuur kan PETG zo sterk hechten dat het verwijderen van het onderdeel het bouwoppervlak beschadigt of het glas doet afbrokkelen. Dit is het tegenovergestelde van het ABS-probleem — in plaats van moeite te hebben om hechting te verkrijgen, is het juist de uitdaging om een gecontroleerde, los te maken hechting te bereiken zonder de printer te beschadigen.
De oplossing hangt af van het bouwoppervlak:
| Oppervlak | Hechting | Persbericht | Aanbeveling |
|---|---|---|---|
| Glad PEI | Te sterk | Kan schade toebrengen aan PEI | Gebruik een lijmstift als losmiddel |
| PEI met structuur | Uitstekend | Goed (kleiner contactoppervlak) | Het beste oppervlak voor PETG |
| Glas (onbekleed) | Gevaarlijk | Kan glas versplinteren | Lijmstift of haarlak verplicht |
| Glas + lijmstift | Goed | Uitstekend | Betrouwbare, voordelige optie |
| BuildTak / vergelijkbaar | Goed | Matig | Prima; laat het afkoelen voordat je het eruit haalt |
| G10 / Garolite | Goed bij 70 °C | Zelf uitbrengen als het leuk is | Onderschat PETG-oppervlak |
De strategie met de lijmstift voor PETG verschilt van die bij ABS. Bij ABS zorgt de lijmstift voor hechting. Bij PETG fungeert de lijmstift als een afneembare scheidingslaag: de PVA-film hecht zich zowel aan het bouwoppervlak als aan het PETG-onderdeel, en de PVA lost op in water of laat zich netjes afpellen, waardoor het onderdeel kan worden verwijderd zonder dat een van beide oppervlakken wordt beschadigd. Breng een dunne, gelijkmatige laag aan op een bed van 60-70 °C, laat deze drogen tot er een waas ontstaat, en het PETG zal goed hechten en zich netjes losmaken.
De Z-offset is de andere cruciale variabele voor de hechting van PETG aan het printbed. In tegenstelling tot PLA, dat baat heeft bij een aanzienlijke ‘squish’ van de eerste laag (vaak 0,05-0,10 mm onder het fysieke nulpunt), geeft PETG de voorkeur aan een iets hogere eerste laag — doorgaans 0,05-0,10 mm boven het nulpunt. Te veel inzakken bij PETG leidt ertoe dat de spuitmond door eerder geëxtrudeerd materiaal sleept, waardoor zich een klodder op de spuitmond ophoopt die uiteindelijk ergens op het printwerk terechtkomt. De juiste eerste laag voor PETG moet zichtbare, duidelijke lijnen hebben die aan elkaar vastzitten, maar niet in elkaar zijn platgedrukt.
Afdrukinstellingen: temperatuur, snelheid en het probleem met dradenvorming
Temperatuur van de spuitmond: 230-250 °C
PETG laat zich goed printen binnen een smal temperatuurbereik. 230-240 °C is voor de meeste merken de ideale temperatuur, waarbij 235 °C een betrouwbaar uitgangspunt is. Onder 230 °C neemt de hechting tussen de lagen sterk af, omdat de geëxtrudeerde druppel niet voldoende kan versmelten met de vorige laag. Boven 250 °C begint PETG thermisch te degraderen — de met glycol gemodificeerde ketens breken af, wat leidt tot verkleuring (vergeling), verminderde mechanische eigenschappen en een sterkere geur.
Het temperatuurbereik is smaller dan bij PLA of ABS, omdat PETG een abruptere smeltkarakteristiek heeft. PLA wordt geleidelijk zachter binnen een bereik van 30 °C, waardoor het minder gevoelig is voor temperatuurschommelingen. PETG gaat binnen een veel kleiner bereik over van vast naar vloeibaar, waardoor temperatuurstappen van 5 °C al merkbare veranderingen in de afdrukkwaliteit veroorzaken. Print een temperatuurtoren van 225 tot 250 °C in stappen van 5 °C en controleer zowel de oppervlaktekwaliteit als de hechting tussen de lagen — de beste temperatuur is doorgaans de hoogste waarbij een schoon oppervlak zonder verkleuring wordt verkregen.
Bedtemperatuur: 70-85 °C
70 °C is de standaard bedtemperatuur voor PETG. Bij 70 °C hecht PETG goed aan voorbehandelde oppervlakken en komen de onderdelen los wanneer het bed afkoelt tot ongeveer 40 °C. Door de temperatuur te verhogen tot 80-85 °C wordt de hechting bij grote onderdelen of complexe geometrieën verbeterd, maar neemt ook het risico op overmatige hechting toe — PETG bij 85 °C op glad PEI zonder losmiddel kan permanent vastkleven. Voor de meeste prints is 70 °C op gestructureerd PEI of met lijstift voorbereide oppervlakken de betrouwbare standaardinstelling.
Koeling van onderdelen: meer dan je denkt
PETG heeft baat bij het koelen van het werkstuk — in tegenstelling tot het advies uit het begin van de jaren 2010 dat nog steeds in verouderde forumberichten te vinden is. De ventilatorsnelheid 30-50% levert de beste combinatie op van oppervlaktekwaliteit, prestaties bij overhangen en hechting tussen de lagen. De ventilatorsnelheid 100% kan leiden tot slechte hechting tussen de lagen, omdat de PETG-druppel afkoelt voordat deze voldoende is versmolten met de vorige laag. Zonder koeling ontstaat een acceptabele hechting tussen de lagen, maar dit leidt tot slechte overhangen, overmatige stringing en een glanzend, doorhangend oppervlak bij kleine details.
De optimale koelstrategie: 0% voor de eerste laag (om de hechting aan het printbed te maximaliseren), 20-30% voor de lagen 2-4 (voor een soepele overgang zonder het materiaal te schokken) en 40-50% voor de overige lagen. Voor bruggen en steile overhangen helpt het specifiek verhogen naar 60-80% voor die elementen om PETG ter plekke te laten uitharden.
Afdruksnelheid: 40-60 mm/s, op één uitzondering na
PETG laat zich goed printen bij 40-60 mm/s voor de randen en 60-80 mm/s voor de vulling — vergelijkbaar met het snelheidsbereik van PLA. Hogere snelheden — 80-100 mm/s — zijn mogelijk met hotends met een hoge doorstroming en zorgvuldige afstelling, maar de smeltviscositeit van PETG is bij dezelfde temperatuur hoger dan die van PLA, waardoor er bij lagere snelheden beperkingen in de doorstroming optreden. De beperkende factor is de volumestroom: PETG dat via een standaard 0,4 mm-nozzle bij 235 °C wordt geëxtrudeerd, haalt maximaal ongeveer 10-12 mm³/s, wat neerkomt op ongeveer 75 mm/s bij een laagdikte van 0,2 mm en een extrusiebreedte van 0,45 mm.
De uitzondering is de eerste laag, die bij PETG met een snelheid van 20-30 mm/s moet worden geprint. Door de langzamere eerste laag krijgt PETG de tijd om het bouwoppervlak goed te bevochtigen en wordt voorkomen dat de spuitmond materiaal meesleept. Dit is belangrijker voor PETG dan voor PLA, omdat PETG plakkeriger is — het hecht net zo gemakkelijk aan de spuitmond als aan het bouwbed — en een langzame eerste laag het contact met de spuitmond minimaliseert, waardoor ophoping wordt voorkomen.
Intrekking: De nemesis van het rijgen
PETG-draden. Het vormt meer draden dan PLA, dan ABS en dan de meeste andere gangbare filamenten. De hogere smeltviscositeit en kleverigheid, die PETG zijn uitstekende laaghechting geven, zorgen er ook voor dat het materiaal niet gemakkelijk afbreekt tijdens terugtrekbewegingen. Het accepteren van een zekere mate van fijne sliertjes — het “engelenhaar” dat rond PETG-prints verschijnt — hoort nu eenmaal bij het werken met dit materiaal.
Voor Bowden-extruders: 5-7 mm terugtrekking bij 25-40 mm/s. Voor direct drive: 1,5-3 mm bij 25-35 mm/s. Als je de terugtreksnelheid verhoogt tot boven 40 mm/s, loop je het risico dat het filament wordt vermalen (PETG is zachter dan PLA bij het tandwiel van de extruder) zonder dat het stringing evenredig afneemt. Als er bij deze instellingen nog steeds draden ontstaan, is het filament vrijwel zeker vochtig — PETG is hygroscopischer dan PLA (het neemt 0,3–0,51 TP3T vocht per gewichtseenheid op) en vochtig PETG vertoont aanzienlijk meer draden dan droog PETG. Droog het filament 4-6 uur bij 60-65 °C voordat u gaat printen.
Extra maatregelen tegen dradenvorming bij PETG: schakel “wipe on retract” in (de spuitmond veegt 1-2 mm terug na elke terugtrekking), schakel “avoid crossing perimeters” in (zorgt ervoor dat de bewegingen binnen het onderdeel blijven) en schakel “z-hop bij terugtrekken” in op een hoogte van 0,2-0,4 mm (til de spuitmond iets op om draden te breken). Deze instellingen samen verminderen het ontstaan van draden effectiever dan welke enkele agressieve terugtrekinstelling dan ook.
Vocht: de stille kwaliteitskiller van PETG
PETG neemt vocht uit de omgevingslucht sterker op dan doorgaans in de technische specificaties van PETG-filament wordt vermeld. Bij een relatieve luchtvochtigheid van 50% kan PETG-filament binnen 48 uur 0,3-0,5% vocht (in gewicht) opnemen. De effecten van vocht op het printen met PETG zijn subtieler dan het knallen en spetteren van nat nylon, maar even schadelijk: meer stringing, een troebele oppervlakteafwerking (vooral zichtbaar bij transparant PETG), verminderde hechting tussen de lagen en microscopisch kleine holtes die de treksterkte met 10–20% verminderen.
Het praktische advies: droog nieuw PETG-filament vóór het eerste gebruik 4 tot 6 uur bij 60-65 °C, ongeacht of het vacuümverpakt is geleverd. Veel fabrikanten drogen het filament niet voldoende voordat ze het verpakken, en het droogmiddelzakje kan het vocht dat het filament al heeft opgenomen niet verwijderen. Bewaar PETG na het drogen in een afgesloten container met droogmiddel en droog het opnieuw na 1-2 weken blootstelling aan de omgevingslucht. Een filamentdroger die rechtstreeks naar de printer voert, is ideaal voor PETG, omdat hiermee de periode waarin het filament opnieuw vocht kan opnemen tussen het drogen en het printen wordt geëlimineerd.
PETG gloeien: de moeite waard vanwege de hittebestendigheid
PETG kan worden gegloeid om de warmtevervormingstemperatuur en de kristalliniteit te verbeteren — een eigenschap die PLA niet heeft. Bij het gloeien wordt het geprinte onderdeel tot een bepaalde temperatuur verwarmd, wordt het daar gedurende een bepaalde tijd op die temperatuur gehouden en vervolgens langzaam afgekoeld. Voor PETG is het gloeiproces 30-60 minuten bij 60-80 °C, gevolgd door langzame afkoeling tot kamertemperatuur gedurende 1-2 uur (het werkt goed om de oven uit te schakelen en het onderdeel erin te laten zitten).
Door PETG te gloeien stijgt de HDT van ongeveer 70 °C naar 80-85 °C, doordat hierdoor gedeeltelijke kristallisatie en spanningsontlasting plaatsvinden. De keerzijde hiervan is maatverandering: PETG krimpt tijdens het gloeien 0,2–0,5% in de X- en Y-richting en 0,5–1,0% in de Z-richting, doordat restspanningen uit het printproces worden opgeheven. Voor onderdelen waarbij de afmetingen cruciaal zijn, moet u teststukken printen, de krimp meten en de afmetingen van de print dienovereenkomstig aanpassen voordat u de definitieve onderdelen gloeit. Gloeien vermindert ook de transparantie — gegloeide PETG-onderdelen worden enigszins troebel doordat kleine kristallieten het licht verstrooien — dus dit proces kunt u het beste reserveren voor functionele onderdelen waarbij hittebestendigheid belangrijker is dan het uiterlijk.
Belangrijkste toepassingen: waar PETG uitblinkt
Printeronderdelen en constructieonderdelen
PETG is het standaardmateriaal voor structurele onderdelen van 3D-printers — bevestigingen voor printkoppen, onderdelen voor portaalconstructies, motorbeugels en behuizingspanelen. Het Voron Design-project, een van de meest invloedrijke open-sourceontwerpen voor 3D-printers, schrijft PETG voor alle geprinte onderdelen voor. De reden hiervoor is logisch: de combinatie van stijfheid (buigmodulus van 2,0 GPa), temperatuurbestendigheid (Tg van 80 °C) en printgemak maakt PETG het ideale materiaal voor onderdelen die motoren en geleidingsriemen vasthouden en hun maatnauwkeurigheid behouden in een verwarmde behuizing bij 50-60 °C. Als die afmetingen nauwkeurig moeten worden overgebracht naar bijpassende onderdelen, dan is onze Handleiding voor toleranties bij 3D-printen is de volgende bron die we moeten bekijken.
Toepassingen in de voedingsmiddelenindustrie en de medische sector
PETG is een van de weinige FDM-materialen die algemeen verkrijgbaar is in voedselveilige kwaliteiten. Het basispolymeer — glycol-gemodificeerd PET — is chemisch identiek aan het materiaal dat wordt gebruikt in verpakkingen voor voedingsmiddelen en dranken. De kanttekeningen bij FDM zijn dezelfde als bij elk ander materiaal: het geprinte oppervlak is poreus en moeilijk te ontsmetten, de pigmenten en additieven in gekleurd PETG zijn mogelijk niet voedselveilig, en de messing spuitmond kan loodverontreiniging veroorzaken. Transparant, naturel (ongepigmenteerd) PETG dat via een roestvrijstalen spuitmond wordt geprint, komt bij FDM-printen het dichtst in de buurt van voedselveiligheid, maar het moet zonder onafhankelijke verificatie worden beschouwd als geschikt voor contact met levensmiddelen, niet als voedselveilig.
Chemisch bestendige onderdelen
PETG is bestand tegen veel gangbare chemicaliën die PLA aantasten. Het is bestand tegen zwakke zuren, basen, oliën, vetten en alcoholen, waaronder isopropylalcohol — die PLA doet barsten en scheuren. Dit maakt PETG de voor de hand liggende keuze voor laboratoriummallen en -opspanningen, opbergrekken voor chemicaliën en alle geprinte onderdelen die waarschijnlijk in contact komen met reinigingsoplosmiddelen. PETG is niet bestand tegen sterke zuren (geconcentreerd zwavelzuur, salpeterzuur), sterke basen (natriumhydroxideoplossing) of gechloreerde oplosmiddelen (dichloormethaan, chloroform), maar zijn chemische bestendigheid dekt het overgrote deel van de blootstellingen in werkplaatsen en laboratoria.
Onderdelen die aan de buitenlucht worden blootgesteld en aan vocht worden blootgesteld
Dankzij de lage wateropname van PETG (0,1-0,2% bij verzadiging, vergeleken met 2-8% voor nylon) en de goede UV-bestendigheid (minder goed dan ASA, maar aanzienlijk beter dan ABS of PLA) is het materiaal geschikt voor buitentoepassingen waar ABS zou afbreken en PLA zou gaan verzachten. Tuinirrigatiefittingen, behuizingen voor buitensensoren, beugels voor zwembadapparatuur en scheepsaccessoires zijn veelvoorkomende toepassingen van PETG. Bij voortdurende blootstelling aan UV-straling buitenshuis blijft ASA de betere keuze, maar PETG presteert in deze categorie beter dan zowel PLA als ABS.
Transparante en optische onderdelen
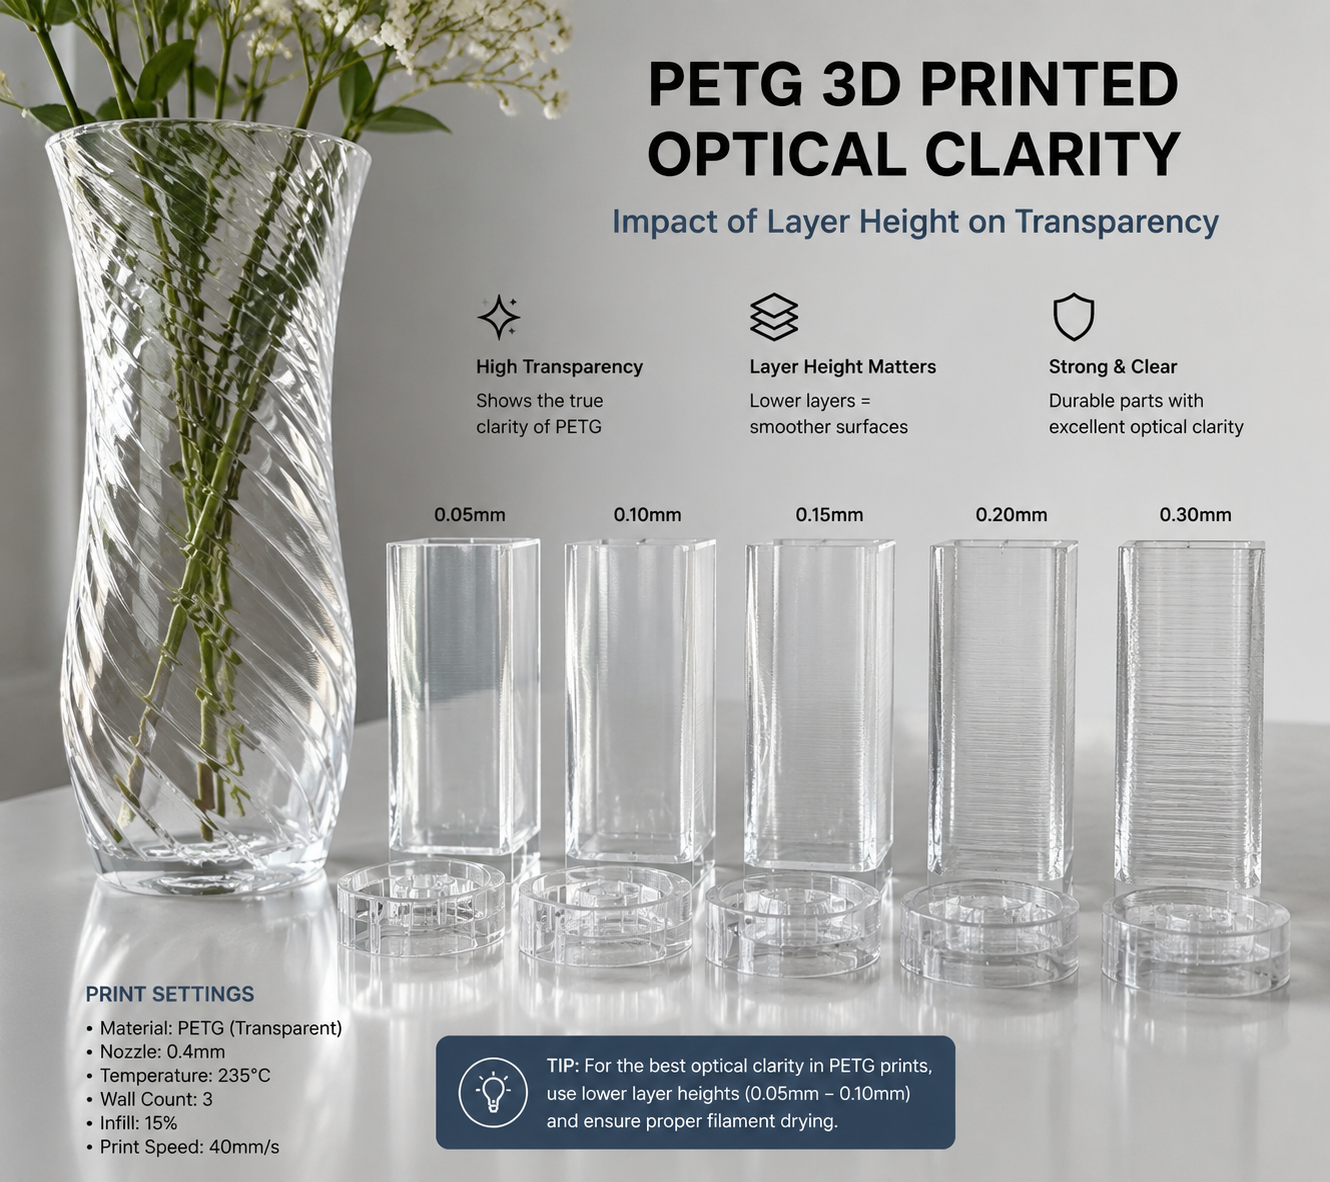
PETG kan met een hoge mate van transparantie worden geprint — een unieke eigenschap onder de gangbare FDM-materialen. De sleutel tot transparante PETG-prints is het printen aan de bovengrens van het temperatuurbereik (240-250 °C) bij minimale koeling (0-20% ventilator) en een grote laaghoogte (0,2-0,3 mm voor een spuitmond van 0,4 mm) met 100% vulling. Deze instellingen maximaliseren de versmelting tussen de lagen en minimaliseren de luchtopeningen en grenzen in de brekingsindex die troebelheid veroorzaken. Nabewerking met een transparante spuitlak of epoxy verbetert de helderheid nog verder door oneffenheden in het oppervlak op te vullen. Voor een breder overzicht van de strategie voor het printen van transparante onderdelen, zie onze een overzichtelijke handleiding voor 3D-printen.
PETG versus PLA versus ABS: het besluitvormingskader
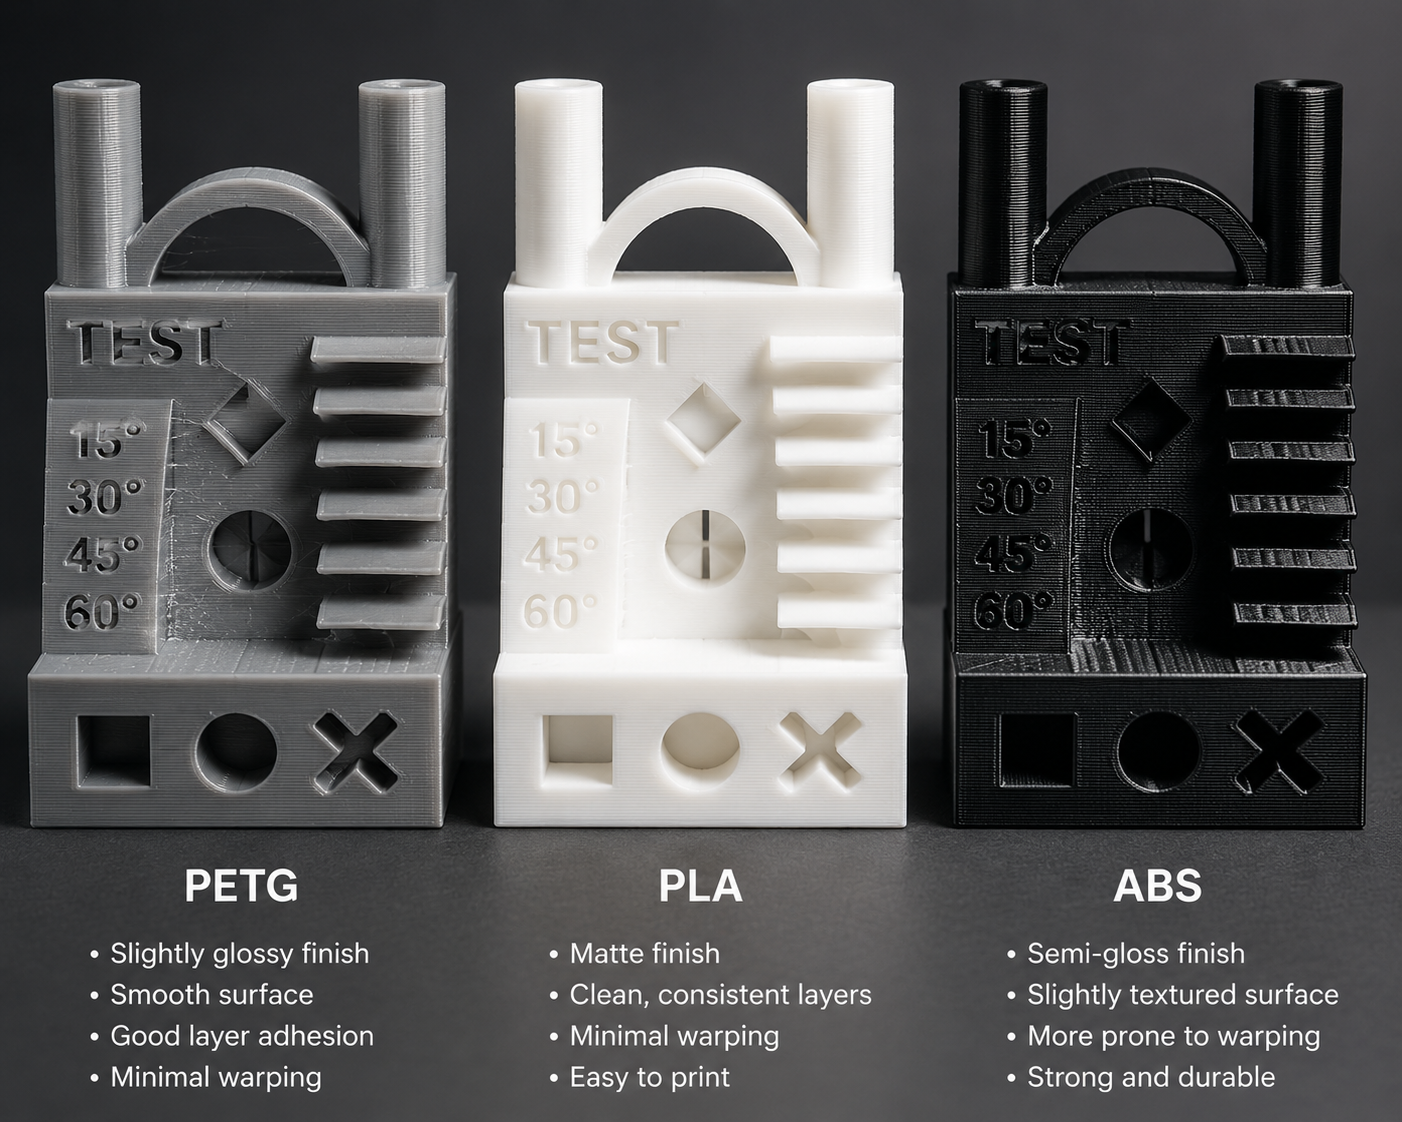
De keuze tussen PETG, PLA en ABS is de meest voorkomende materiaalkeuze bij FDM-printen, en het antwoord hangt af van een aantal toepassingsspecifieke vragen:
| Criterium | Kies voor PLA als | Kies voor PETG als | Kies ABS als |
|---|---|---|---|
| Temperatuur | omgevingstemperatuur < 50 °C | Omgevingstemperatuur van 50-70 °C | Omgevingstemperatuur van 70-95 °C |
| Slagvastheid/Taaiheid | Weinig belasting, onderdelen voor displays | Matige impact, functioneel | Zeer stevige klikverbinding |
| Nabewerking | Alleen schilderen | Beperkt (moeilijk te schuren) | Volledig (schuren, dampfijnglans) |
| Blootstelling aan chemische stoffen | Vermijd oplosmiddelen en IPA | Bestand tegen IPA, oliën en zwakke zuren | Vergelijkbaar met PETG |
| Afdrukgemak | Het eenvoudigst, zonder behuizing | Gemakkelijk tot matig, geen omheining | Moeilijk, moet worden omheind |
| Transparantie | Mogelijk, maar beperkt | Het meest geschikt voor doorzichtige onderdelen | Van nature ondoorzichtig |
De beslissingsstroom die de meeste gevallen dekt: als transparantie of chemische bestendigheid vereist is, kies dan voor PETG. Als het onderdeel bestand moet zijn tegen temperaturen van 70-95 °C of moet worden gladgemaakt met aceton-damp, kies dan voor ABS. Voor al het overige — prototypes, displaymodellen, functionele onderdelen die weinig worden belast — kiest u PLA vanwege het ongeëvenaarde printgemak, of PETG als de slagvastheid de iets grotere complexiteit bij het printen rechtvaardigt.
Veelvoorkomende problemen bij het printen met PETG en oplossingen daarvoor
Aanslag op de sproeikop: het ‘blob’-probleem
PETG hoopt zich meer op de spuitmond op dan welk ander gangbaar filament dan ook. Door de kleverigheid van het materiaal in combinatie met de neiging om lichtjes op te krullen bij het verlaten van de spuitmond, blijven er onvermijdelijk kleine hoeveelheden aan het oppervlak van de spuitmond kleven. Tijdens een langdurige printbeurt groeit deze ophoping uit tot een klodder die uiteindelijk op het printwerk terechtkomt of eraf valt, waardoor een defect ontstaat.
Oplossingen: gebruik een siliconenhoesje om het verwarmingsblok (voorkomt dat PETG aan het hete metaal blijft kleven); verlaag de extrusiefactor naar 95-98% (een lichte onder-extrusie voorkomt dat de spuitmond door overtollig materiaal sleept); verhoog de Z-offset met 0,02-0,05 mm (vermindert het contact van de spuitmond met de print); en gebruik een messingborstel of spuitmondwisser in de start-G-code van de printer om de spuitmond voor elke print schoon te maken. Bij lange prints voorkomt het periodiek afvegen van de spuitmond tijdens verplaatsingen — ingeschakeld in de slicer als “wipe nozzle” — dat er zich afzettingen ophopen tot een problematisch niveau.
Broos PETG: de ‘wet filament trap’
PETG dat broos afdrukt — en dus gemakkelijk breekt in plaats van buigt — is steevast vochtig. Het vocht dat door het filament wordt opgenomen, zorgt ervoor dat de esterbindingen in de PETG-hoofdstructuur onder invloed van de hitte tijdens het printen hydrolyseren, waardoor het molecuulgewicht afneemt en het materiaal broos wordt. Een print die direct na het printen perfect lijkt, kan in de loop van enkele dagen broos worden doordat het resterende vocht het polymeer blijft hydrolyseren. De oplossing is altijd drogen: bij 60-65 °C gedurende 4-6 uur krijgt PETG zijn oorspronkelijke mechanische eigenschappen terug. Er is geen slicer-instelling die vochtig filament kan compenseren.
Gebrekkige overhangen en brugvorming
Overhangen bij PETG vormen een uitdaging omdat het materiaal na het extruderen langer zacht blijft dan PLA — door de lagere afkoelsnelheid kan de geëxtrudeerde draad doorhangen voordat deze uithardt. Oplossingen: verhoog de koeling van het onderdeel specifiek voor overhanggebieden tot 50-60% (de meeste slicers ondersteunen het handmatig instellen van de koeling voor bruggen en overhangen); verlaag de printsnelheid voor overhangen tot 50% van de normale omtreksnelheid; verlaag de laaghoogte tot 0,12-0,16 mm voor het overhanggebied (dunnere lagen koelen sneller af en zakken minder door); en overweeg het gebruik van ondersteuningsmateriaal voor overhangen die meer dan 45 graden van de verticaal afwijken.
Conclusie: Waarom PETG de gulden middenweg is
PETG blinkt nergens in uit. PLA is makkelijker te printen. ABS is beter bestand tegen hogere temperaturen. PC is sterker. Nylon is beter bestand tegen chemicaliën. ASA is beter bestand tegen weersinvloeden. Maar PETG presteert op alle vlakken goed genoeg — printbaarheid, sterkte, temperatuurbestendigheid, chemische bestendigheid, helderheid, kosten — om de meeste functionele printtaken aan te kunnen zonder de gespecialiseerde eisen die elk van de “beste” materialen stelt.
Voor de ingenieur die een beugel nodig heeft die bestand is tegen een zonnige vensterbank, de hobbyist die een vervangend onderdeel voor de vaatwasser print, de exploitant van een printfarm die betrouwbare resultaten nodig heeft op tientallen printers, of iedereen die PLA ontgroeid is maar geen behuizing wil bouwen en geen last wil hebben van ABS-dampen: PETG is de oplossing die werkt. Het is niet spannend. Het is niet exotisch. Het is gewoon effectief — en voor de meeste functionele 3D-printtoepassingen is dat precies wat nodig is.
Veelgestelde vragen
Waarom blijft PETG aan mijn spuitmond plakken?
Aanslag op de PETG-spuitmond ontstaat door een combinatie van de inherente kleverigheid van het materiaal, lichte over-extrusie en contact van de spuitmond met eerder geprint materiaal. De meest effectieve oplossingen zijn het aanbrengen van een siliconenhoesje op het verwarmingsblok, het verlagen van de extrusiemultiplicator naar 96-98% en het verhogen van de Z-offset met 0,02-0,05 mm, zodat de spuitmond iets hoger boven de print komt te liggen. Het afvegen van de spuitmond met een messingborstel aan het begin van elke afdruk helpt ook. Als de afzetting aanhoudt, controleer dan of het filament droog is — nat PETG is plakkeriger en vatbaarder voor afzetting.
Kan ik PETG op een glazen bed printen zonder lijm?
Dit wordt ten zeerste afgeraden. PETG kan zich zo stevig aan onbehandeld glas hechten dat er bij het verwijderen van het onderdeel stukjes uit het glasoppervlak losraken. Dit is geen theoretisch probleem — het is een goed gedocumenteerde manier waarop het kan misgaan. Breng vóór het printen een dun laagje PVA-lijmstift of haarlak aan op het glas als een opofferingslaag. De lijm lost na het printen op in water, waardoor het onderdeel veilig kan worden verwijderd. Als u toch PETG op onbehandeld glas wilt printen, wacht dan tot het printbed volledig is afgekoeld tot kamertemperatuur voordat u het onderdeel probeert te verwijderen — het verschil in thermische krimp kan de hechting verbreken, maar het risico op glasschade blijft bestaan.
Hoe zorg ik ervoor dat PETG-prints helder en transparant worden?
Voor het printen met transparant PETG zijn drie voorwaarden nodig: een hoge spuitmondtemperatuur (240-250 °C) om de versmelting tussen de lagen te maximaliseren, minimale afkoeling van het onderdeel (0-20%-ventilator) om de lagen de tijd te geven om te versmelten zonder dat er luchtgrenzen ontstaan, en grote laaghoogtes (0,2-0,3 mm voor een spuitmond van 0,4 mm) om het aantal laagovergangen te verminderen. Print met een vulling van 100% en een monotoon, massief vullingspatroon. Het geprinte onderdeel zal doorschijnend zijn in plaats van volkomen transparant — de laaglijnen verstrooien nog steeds het licht. Nabewerking met een heldere acrylspray of een tweecomponenten-epoxycoating vult oneffenheden in het oppervlak op en verbetert de helderheid aanzienlijk. Voor het beste resultaat print je met de breedste lijnbreedte die je spuitmond ondersteunt (0,6-0,8 mm extrusiebreedte bij een spuitmond van 0,4 mm) om het aantal extrusielijnen per laag te minimaliseren.
PETG versus PLA+: welke is sterker?
PETG is aanzienlijk taaier dan standaard PLA, maar vergelijkbaar met sommige PLA+ (gemodificeerde PLA)-formuleringen. Standaard PLA heeft een Izod-slagvastheid van 30-50 J/m; die van PETG ligt tussen 80 en 110 J/m; hoogwaardige PLA+ kan 60-100 J/m bereiken. De breukwijze verschilt echter: PLA en PLA+ breken bros af bij hun rekgrens (5–15%), terwijl PETG meegeeft en uitrekt (15–25% rek) voordat het breekt. Door deze ductiele breukwijze zijn PETG-onderdelen bestand tegen overbelasting doordat ze vervormen in plaats van te versplinteren — een cruciaal verschil voor functionele onderdelen die te maken kunnen krijgen met onverwachte belastingen. Voor toepassingen waarbij ductiliteit bij overbelasting belangrijker is dan de uiteindelijke sterkte, is PETG de veiligere keuze, zelfs als de waarden in de technische specificaties vergelijkbaar zijn.

